
Set up Claims Contacts | Assign Claims Contacts | Claim Status Report

Set up Claims Contacts for Claims Reporting
Claims Reporting must be set up individually for each vertical of a group. Be sure to select the desired vertical from the Current Group link in the top-left before continuing.
- Select Setup from menu bar
- Select Claims Reporting
- Read the disclaimer, and click Accept
- Click New to add a new claims contact
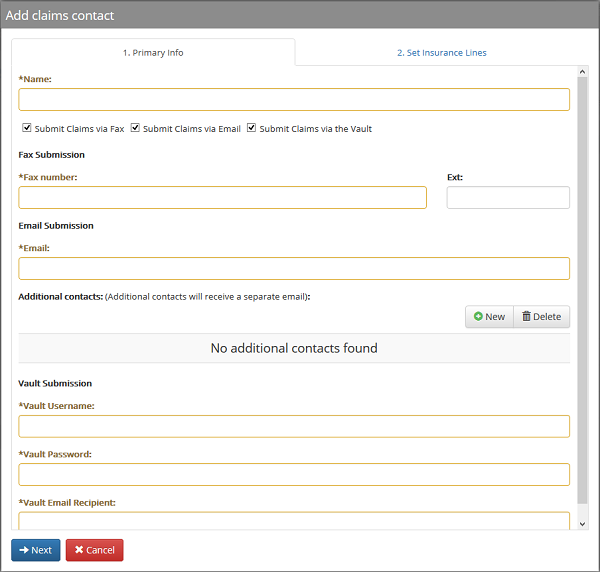
- On the first tab, Primary Info,
- Enter the name of the claims contact in the Name field
- Check the box(s) for how claims should be submitted to the contact (via email, fax, and/or the Vault)
- For Submit Claims via Fax, enter in the fax number
- For Submit Claims via Email, enter in the email address
- If you would like additional contacts to receive the claims submission email, click New under the Additional Contacts section
- Enter in the Email address
- Click Add
- If you selected Submit Claims via the Vault, enter in the vault username, password, and email recipient
- Click Next
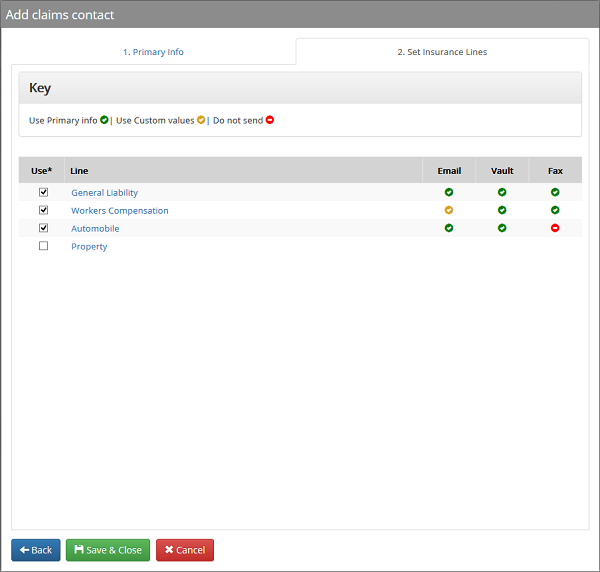
- In the second tab, Set Insurance lines, specify the applicable lines of coverage for the claims contact
- Check the box next to the insurance line(s) that are associated with the claims contact
- If the submission method for one of the insurance lines should be different than what was established in the Primary Info tab, click on the name of the insurance line to modify the submission method
- Under each tab (Email, Vault, Fax), select the claims contact setting:
- Do not send – the claim will not submit using that method
- Primary – the claim will submit with the information from the Primary Info tab
- Custom - the claim will be submitted using custom information
- Click Done
- Under each tab (Email, Vault, Fax), select the claims contact setting:
- If the submission method for one of the insurance lines should be different than what was established in the Primary Info tab, click on the name of the insurance line to modify the submission method
- Check the box next to the insurance line(s) that are associated with the claims contact
- Click Save & Close
Assign Claims Contacts to Clients for Claims Reporting
- Select Clients from menu bar
- Select Manage Clients
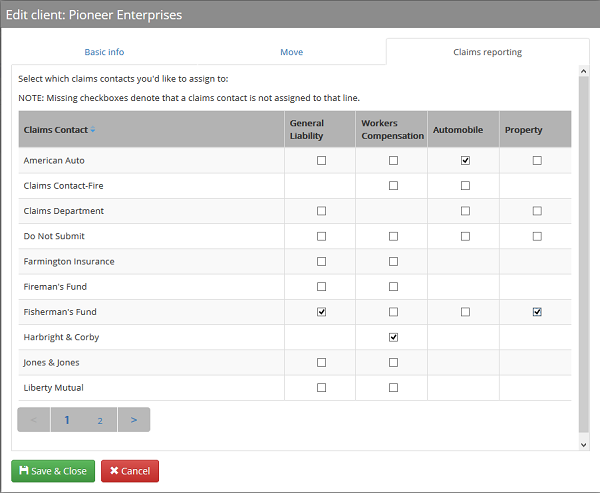
- Find the client you would like to assign claims contacts to, and click on the name of the client
- Select the Claims Reporting tab
- Use the check-boxes to select which claims contact you would like to assign to the client per line of coverage
- If you select more than one claims contact for a line of coverage, the client will be given the option of which claims contact to submit the claim to
- Click Save & Close
Note: Once you have set up claims reporting for a client, an option will be added at the end of the incident wizard in Incident Track™ to submit the claim. Prior to the client submitting an actual claim, we recommend that you work with your client and the claims contact to conduct a test claims submission to confirm that the claims contact successfully receives the claim.
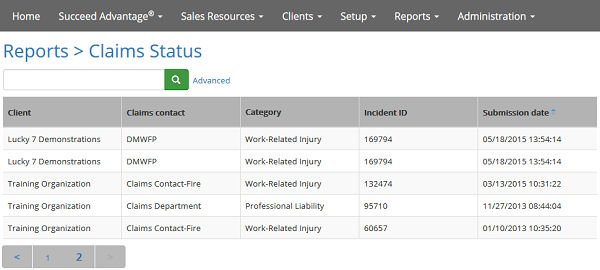
View Claim Status Report
The claim status report shows you information about the claims your clients have submitted including the name of the client, claims contact, incident category, incident ID, and submission date.
- Select Reports from the menu bar
- Select the Claims Status report
Comments
0 comments
Please sign in to leave a comment.