
Basic Search | Advanced Search | Edit Client | Move Client | Claims Reporting | Reset Passwords | Login as Client
From the Manage Clients section, you are able to add new clients, view and edit information about existing clients, view their usage information, and log into a specific client's instance.
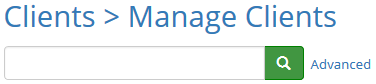
Searching Clients using Basic Search
- From the Clients menu, select Manage Clients
- In the search bar, type in the name or part of the name of the client
- Click the green Search icon to conduct the search which will only include the clients in the current group
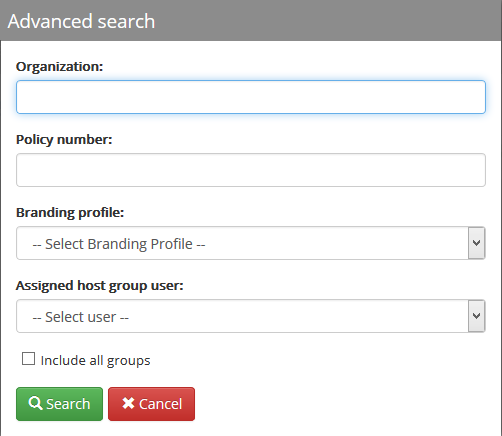
Searching Clients using Advanced Search
- From the Clients menu, select Manage Clients
- Click on Advanced next to the Search bar. In the Advanced search you have the option to search by organization name, policy number, and/or branding profile
- Type in the search criteria
- If you would like to search across all groups, check the box next to Include all groups
- Click Search
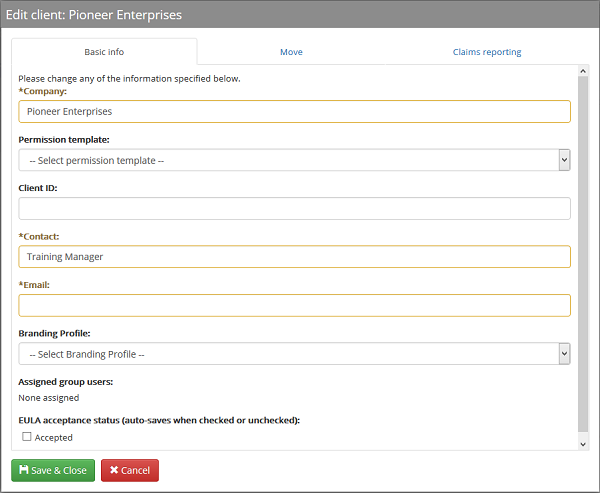
View/Edit Basic Info for a Client
- From the Clients menu, select Manage Clients
- Select the name of the client you would like to edit/view
- The Basic Info tab lists the basic information about the client. Here you can:
- Edit the Company name, Main Contact, and Contact email (all are required fields)
- Set the permission template if your host group has clients with different levels of access
- Set the branding profile if you are using the Co-branding feature (Co-branding profiles are established in the Setup menu)
- View the assigned group users
- View/edit the EULA acceptance status
- If making any changes to the Basic Information, click Save to confirm changes
Move Client to a Different Group
- From the Clients menu, select Manage Clients
- Click on the name of the client you would like to move to a different group
- Select the Move tab
- From the drop-down menu, select the new group you would like to move the client to
- Click Save

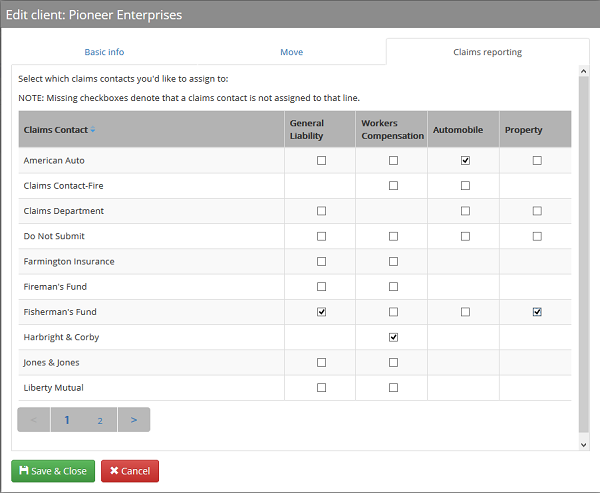
Setup Claims Reporting for a Client
Note: In order to setup claims reporting for a client from the Manage Clients area, the claims contact(s) must have first been setup from the Setup menu
- From the Clients menu, select Manage Clients
- Click on the name of the client you want to setup claims reporting for
- Select the Claims Reporting tab
- Use the check boxes to indicate which claims contacts should be assigned to the client by line of insurance
- Click Save
Reset Client Account User Passwords
- From the Clients menu, select Manage Clients
- Select the name of the desired client
- Select the Users tab
- Click the Reset icon
 to the right of the desired user
- Email Subject: Login and password reminder…
- Sending address: do-not-reply@email.rmmail.info
Log in as a Client
- Select Manage Clients from the Clients menu
- Click the icon in the Login column to the right of the desired client
- Select the client account user to log in as
- The Primary User is always at the top of the user list
- Click the user dropdown menu in the top-right of the client site and select Return to go back to the administration site
Comments
0 comments
Please sign in to leave a comment.